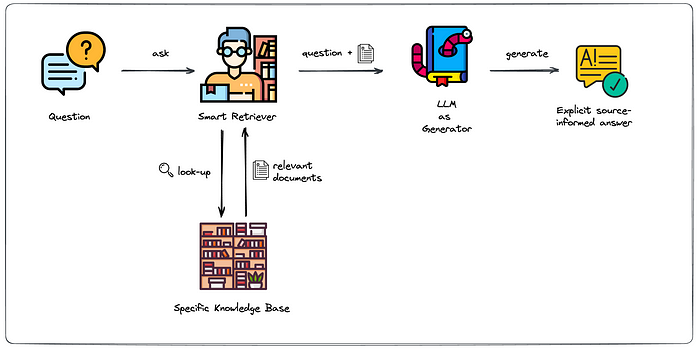
Retrieval-Augmented Generation (RAG) is used to leverage external documents (e.g., Wikipedia or official documents) to augment their knowledge and achieve state-of-the-art query results. With the idea of RAG, we can build an enhanced question answering: based on the question asked, first, retrieve the most relevant information from the created knowledge base; then augment the typical generation phase by passing that relevant information explicitly to the generator component.
Image credit: Leveraging LLMs on your domain-specific knowledge base
Firstly, to create a knowledge base, use the Milvus vector database or Zilliz Cloud to insert and retrieve data. The principle is to extract the feature vectors of the documents, store them in the vector database, and then retrieve relevant document content through vector similarity search.
Before running the pipeline to insert data into the knowledge base, we first create Milvus collection:
- The dim should be the same as the dimension of the vector generated by the embedding_model in the pipeline. The default model is 'all-MiniLM-L6-v2', which generates a 384-dimensional vector, so set dim=384.
- The collection schema should contain the following four fields, i.e. id, text_id, text, and emebedding.
from pymilvus import connections, FieldSchema, CollectionSchema, DataType, Collection, utility

collection_name = 'chatbot'
dim = 384

connections.connect(host='127.0.0.1', port='19530')

fields = [
 FieldSchema(name='id', dtype=DataType.INT64, description='ids', is_primary=True, auto_id=True),
 FieldSchema(name='text_id', dtype=DataType.VARCHAR, description='text', max_length=500),
 FieldSchema(name='text', dtype=DataType.VARCHAR, description='text', max_length=1000),
 FieldSchema(name='embedding', dtype=DataType.FLOAT_VECTOR, description='embedding vectors', dim=dim)
]
schema = CollectionSchema(fields=fields, description='enhanced qa')
collection = Collection(name=collection_name, schema=schema)

index_params = {
 'metric_type':"IP",
 'index_type':"IVF_FLAT",
 'params':{"nlist":128}
}
collection.create_index(field_name="embedding", index_params=index_params)Then you can run the eqa-insert pipeline for inserting document data:
- Make sure you have created the specified collection.
- You can set the model-related configuration(refer to the Interface section) to extract the feature vectors of the text, such as embedding_model (defaults to 'all-MiniLM-L6-v2') and embedding_device (defaults to -1, which means CPU), and the embedding_model should be consistent with the eqa-search pipeline.
from towhee import AutoPipes, AutoConfig

insert_conf = AutoConfig.load_config('eqa-insert')
insert_conf.host = '127.0.0.1'
insert_conf.port = '19530'
insert_conf.collection_name = 'chatbot'

insert_pipe = AutoPipes.pipeline('eqa-insert', config=insert_conf)
insert_pipe('https://github.com/towhee-io/towhee/blob/main/README.md')
The main workflow of the eqa-insert pipeline is as follows:
In summary, the inserted document will be split into multiple texts, which means that multiple text feature vectors will be inserted. So, we can see the number of vectors in the collection by running collection.flush() and collection.num_entities.
Finally, you can run the eqa-search pipeline to ask questions:
- Make sure the specified collection has been inserted data and loaded into memory
- You can set the model-related configuration(refer to the Interface section) to extract the feature vectors of the text, such as embedding_model (defaults to 'all-MiniLM-L6-v2') and embedding_device (defaults to -1, which means CPU), and the embedding_model should be consistent with the eqa-insert pipeline.
- You can set the corresponding large model for generating answers by openai_model or dolly_model.
search_conf = AutoConfig.load_config('eqa-search')
search_conf.host = '127.0.0.1'
search_conf.port = '19530'
search_conf.collection_name = 'chatbot'
search_conf.llm_src = 'openai'
search_conf.openai_api_key = 'you-openai-key' # your chatgpt api key

search_pipe = AutoPipes.pipeline('eqa-search', config=search_conf)
res = search_pipe('What is towhee?', history=[])
The main workflow of the eqa-search pipeline is as follows:
The eqa-search pipeline also supports contextual search, you can pass in contextual data via history(List[(query, answer)]) and the contextual history will be requested as prompt in the LLM. As follows, the contextual search is implemented via a while loop:
history = []
while True:
 query = input("Question: ")
 if query == 'exit':
 exit()
 if query == 'clear':
 history = []
 continue

 ans = search_pipe(query, history).to_list()[0][0]
 print(ans)
history.append((query, ans))name: str
The name of the built-in pipeline, such as 'eqa-insert', and 'eqa-search'.
name: str
The name of the built-in pipeline, such as 'eqa-insert', and 'eqa-search'.
config: REGISTERED_CONFIG
The REGISTERED_CONFIG with AutoConfig, such as AutoConfig.load_config('eqa-insert') and AutoConfig.load_config('eqa-search').
You can check the configuration in towhee/eqa-insert. For example, you can set the Zilliz Cloud account:
- Before running the pipeline, you need to create a collection first.
from towhee import AutoPipes, AutoConfig

insert_conf = AutoConfig.load_config('eqa-insert')

# set your Zilliz Cloud info

insert_conf.host = 'your-zilliz-host'
insert_conf.port = 'your-zilliz-port'
insert_conf.user = 'your-zilliz-user'
insert_conf.password = 'your-zilliz-password'
insert_conf.collection_name = 'your-zilliz-collection'

insert_pipe = AutoPipes.pipeline('eqa-insert', config=insert_conf)You can check the configuration in towhee/eqa-search. For example, you can set the Zilliz Cloud account:
search_conf = AutoConfig.load_config('eqa-search')

# set your Zilliz Cloud info

search_conf.host = 'your-zilliz-host'
search_conf.port = 'your-zilliz-port'
search_conf.user = 'your-zilliz-user'
search_conf.password = 'your-zilliz-password'
search_conf.collection_name = 'your-zilliz-collection'
search_conf.llm_src = 'openai'
search_conf.openai_api_key = 'you-openai-key' # set your key

search_pipe = AutoPipes.pipeline('eqa-search', config=search_conf)
And you can also set the LLM to Dolly:
search_conf = AutoConfig.load_config('eqa-search')

# set your Zilliz Cloud info

search_conf.host = 'your-zilliz-host'
search_conf.port = 'your-zilliz-port'
search_conf.user = 'your-zilliz-user'
search_conf.password = 'your-zilliz-password'
search_conf.collection_name = 'your-zilliz-collection'
conf.llm_src = 'dolly'

search_pipe = AutoPipes.pipeline('eqa-search', config=search_conf)